Master Sword sleeps.

Just as the Master Sword in Zelda laid sleeping in the forest, I’ve been sleeping on the blog posts.

I haven’t posted for a while because I’ve been waiting for the professional photos to be ready. Just saw them yesterday and I’ll be getting the high res files soon and making more blog posts.

In the meantime, here’s a quick taste. I love this shot because it reminds me so much of Zelda and some of the official art that has been created. Amazing. And I didn’t even instruct them to do it either.


wedding-ceremony-sword.jpg

Photo by JLPhotografia


Wedding – Heart Piece in chest

It seemed fitting for our sweet heart table to have the Zelda Piece-of-heart as a centerpiece. To dress it up more, I created a foliage arrangement inside a treasure chest with rupees and jewels.


zelda heart piece in chest


The chest is a ready made chest found at a craft store. The foliage is made from preserved moss, plastic jewels, fake ferns and ivy, moss rocks, mini pine cone filler. The heart piece is made from plastic custom cut at Tap Plastics and craft foam for the red heart, painted with liquitex acrylic paints and glitter glue. The rupees are paper craft.

My new husband will always have a piece of my heart ^.^

Mike cheers at sweetheart table


Wedding – Spirit Flute Centerpiece

This centerpiece is the Spirit Flute from Legend of Zelda: Spirit Tracks. Link looks so adorable playing it.

Believe it or not, it’s made from Playtex gentle glide tampon holders. No I’m not joking. I got the idea from TamponCrafts.com.

Other materials include craft foam for the front plate, beads, cross stitch floss, and liquitex paint.

zelda wedding pan flute centerpiece


Wedding – Banners and more Favors

So I learned that there’s a technique called bunting where you take triangles of fabric and sew them inbetween a thin strip of fabric to create banners. I thought this would be suitable for the wedding because its a quick and easy way to add color to various areas of the venue and it also has a medieval look to it.

I also painted a water pattern and a few triforces to make it more Zelda-ish.

I created three signs; table assignments, bathroom, and spirits (for the bar!). Pictured below are a couple of the signs as well as the favors as they were displayed on the favors table.

The favors doubled as table assignments and contained the guest’s name and a picture of the centerpiece of their table, so they would know visually what table they were to go to.

zelda wedding favors table flags bunting


Wedding – Lens of Truth Centerpiece

Making its debut in The Legend of Zelda: Ocarina of Time, the Lens of Truth aids Link in seeing invisible objects, enemies, and hidden passageways. 

Something about the Lens of Truth’s design has seemed creepy to me. But I chose to include it as a wedding centerpiece because it’s so unique and wasn’t too hard to create.

This was made using a plastic circle from Tap Plastics, craft foam, creative paperclay (thanks for the tip Jennifer Hom!), glitter glue, and acrylic paints. 

The fabric I found to use for the Lens of Truth’s pillow is especially neat because it changes from purple to red depending on the lighting and angle you view it at. A perfect match for the red and purple design of the Lens of Truth.

zelda wedding lens of truth centerpiece


Wedding – Book of Mudora Centerpiece

Today’s prop played a special role in the wedding. The Book of Mudora was used by Link in Legend of Zelda: A Link to the Past to translate Hylian text and allow him to enter the Desert Palace.  Our officiant used the Book of Mudora to hold the reading material for the ceremony. It also doubled as a centerpiece.

I created it by finding an old book and painting the outside cover with acrylic paints.

A special note about our officiant; my brother who is an officer in the US Navy officiated the ceremony. I thought it was weird to hire a stranger to handle the most special part of the wedding day so having a family member help with this made it more special. You can also blame my brother for my love of Zelda games. He traded my beloved Turtles in Time game for A Link to the Past (without my permission!), but it was worth it.

book of mudora zelda wedding


Wedding – Slingshot Centerpiece

Today I have another Zelda wedding centerpiece; the slingshot. Originally I was going to base this off of the slingshot from Ocarina of Time. But when I saw the Skyward Sword slingshot design, I knew that would be a better fit. But I did at least include the deku nuts amunition from Ocarina of Time.

The artistic style and colors of Skyward Sword and Wind Waker are much brighter and more colorful. So this is why I chose for both the bow & arrow and the slingshot to be based on the Skyward Sword designs.

Made from craft foam, acrylic paint, and lanyard cord. The deku nuts are just small Styrofoam balls painted with acrylic paint.

sling shot pictures


Wedding – Boomerang Centerpiece

Another centerpiece from my Zelda themed wedding, the boomerang. A classic weapon used by Link to stun enemies and grab hard to reach items. I wish I had better quality photos of this one. I’m sure the professional photos will look much better but they wont be ready until another 8 weeks or so.

The design for this was modeled after the Wind Waker boomerang. Except I changed the center portion from gray to purple. Purple is complementary to yellow so it works well. I also added a wind swirl element to make it more interesting and wind waker-like.

Made from craft foam, modeling paste, acrylic gel, acrylic paint.

zelda boomerang centerpiece


Wedding – Wooden Signs

wedding-wooden-signs.jpg

Our venue is in a remote area of the Santa Cruz mountains down some windy roads. The venue owner suggested we make some signs to guide guests once they exit the freeway.

My Dad’s house had a wooden fence that was getting torn down last year so I asked the neighbor to save a few slats of the fence for me. The aged wood I thought would come in handy for some signage, which also reminds me a lot of Zelda.

Mike sawed the slats in half and nailed them to wooden garden stakes (~$0.60 each) that we got at the hardware store. Then I painted them with acrylic paints to say "Mike & Susie." I painted on a boomerang to be used as an arrow to indicate which way to go. The boomerang is also used in the invitation so I hoped it would be another cue to guests that it’s the right sign to follow.

The nails did not work out well. Once Mike’s Dad used the mallet to get them to stick in the ground, the signs fell off. Learning lesson, use screws and a drill instead of nails.


Wedding – Bottle Centerpieces

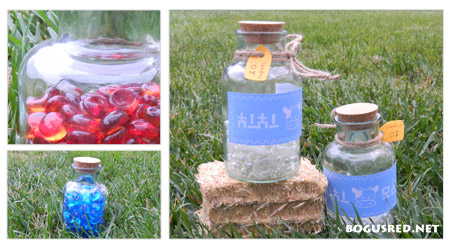
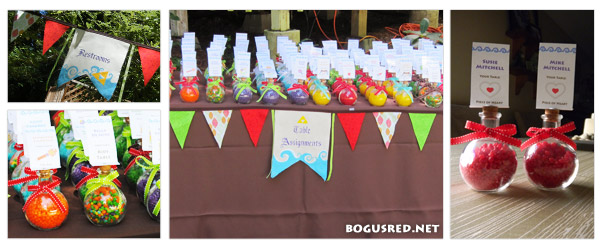
I came across this neat little Japanese store that was selling these awesome glass corked bottles. I thought they were an exact match to the Zelda potion bottles so I bought a few to use for centerpieces. These perhaps are not the most creative of my centerpieces, but they were very quick to make.

I created one for red potion, blue potion, green potion, and Lon Lon milk. I thought it might be too hard to prepare and transport colored liquid to the venue so I decided it might be easier if I just fill the bottles with colored stones. I saw an ad in Michael’s that glass stones were on sale for 99 cents a bag. I bought two red, two blue, and two green ($6 total for the stones) and each glass bottle was about $2. Plus $1.25 for a remnant fabric and I spent a total of about $13 for this centerpiece.

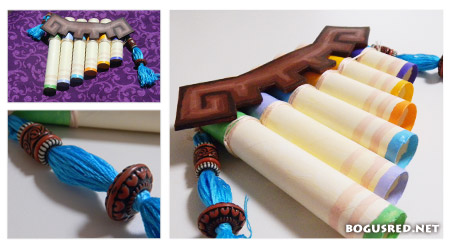
For the milk bottles, I designed a label in photoshop and printed it on some thicker paper. I attached the paper to the glass bottles using liquitex gel medium (thanks for the tip Mike Dutton!). I also bought a few small hay bales at a craft store to help complete the farm look.

red potion, blue potion, lon lon milk