Wig modification

Someone recently asked me about my Link wig so I thought I’d post some details. Basically I bought a wig and made some simple modifications to it. This entry will explain the details…

The wig I use is a Mona Lisa Collection wig. I don’t know which model it is (the tag doesn’t say), but you can probably find it online somewhere. I happened to come across it at a kiosk at a local mall. I think I paid around $30 USD for it. The wig works great. It has a nice color and a somewhat realistic hair texture. It doesn’t look like those cheap wigs that are really shiny.

The only thing it was missing was the side burn hair that Link has that dangles on the sides. I was able to add this myself in a few easy simple steps. For this, you’ll need some scrap cotton like fabric such as muslin, thread (any color), a sewing machine, your wig, and another wig to cut hair from.

You’ll need another wig of a similar color with long hair that you are willing to cut pieces from. I happened to have a wig that I was using for spare hair already. It is a much cheaper wig that I paid about $20 for and has much longer hair on it.

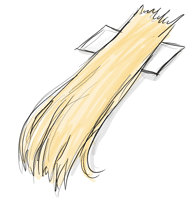
Next you’ll need to cut a chunk of the hair from your spare parts wig. Be sure that it is a few inches longer than you want it to hang. The reason for this is you’ll be folding the hair over to make the hair less likely to come out of the stitches.

Then, lay down the hair on a strip of muslin or similar fabric with an inch or so hanging off of the strip. It doesn’t matter a whole lot what color the fabric is because it wont be visible.


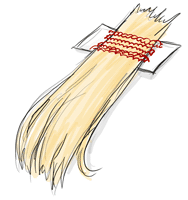
Then set your sewing machine to a strait stitch at the smallest stitch setting. Then just start stitching back and forth like crazy. You’ll need to go over the area several times to make sure the hair doesn’t come loose.


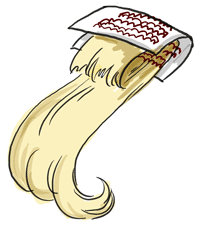
Once you do that, fold the fabric in half so that the other end of the hair is pointing down. Now stitch some more with your sewing machine. Doing this helps to keep the hair from coming out. Trim some of the excess hair from the folded end.


Once you’ve got your strip, you can sew it to your wig. Just hand sew it into place where you want it. The black thread is from the sewing machine. You can see how much I stitched back and forth. The red at the bottom is where I attached the strip to the wig.


You’ll likely want to trim the hair to give it a more natural edge. Don’t just go strait across. Give it some layering.

And that’s all there is to it! Now you can look smexy just like Link.


One boot done

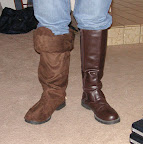
I just wanted to make a quick post showing the status of my boots. I’ve finished one boot and it looks pretty awesome. Here’s a picture showing before and after of the boots. One on the left is the Link boot, one on the right is what I started with. I still have a bit of tweaking to do on it but it mostly looks the way I want it too. By the way, these boots cost me $7 at Good Will.


Started the Chain Mail

In my last blog entry I talked about how I planed to make the rings for the chain mail myself based on a tutorial I found on youtube.  A couple weekends ago I visited a friends house and heard he had experience making chain mail shirts and such. I talked to him about it and after talking with him I was convinced of two things. One, creating a whole suit would not be a good idea because a) it would take too long and b) it is too darn heavy. I tried on his chain mail shirt and I know I would be dying after walking around a whole day wearing that thing. Two, not to make my own rings. Instead, buy them online from TheRingLord.

Purchasing premade rings has its advantages. For one, there’s better selection of metal, color, diameter, and thickness. I purchased three pounds of the 1/4 inch brass 14G rings. My friend suggested that 2 pounds would be enough to cover the little spots on my Link costume that show the chain mail so I went ahead and got 3 just in case. Now that I’ve got it, I’m not sure 3 is enough. I also wish I had either gone with a larger diameter or something less thick because the 1/4 inch 14G is difficult to work with. But I’ve started to get the hang of it. It’s going to look hella sweet once it’s done. It’s also a nice color. It’s a better match to the color of Link’s chain mail. My hands are pretty sore already after two nights of linking rings.

I’ve decided not to do the skirt by Fanime. Instead it will be a goal for Halloween. Link’s skirt area of his tunic has a slit on each side which means if I want to have chain mail there I’ll pretty much have to make an entire chain mail skirt. And if I am going to make a skirt I want to make it out of thinner and bigger rings. Perhaps that will be a goal to complete by halloween.

More updates to come.


Preparing for Fanime, revisiting TP Link costume

Fanime is only a couple months away and I plan to wear my TP Link costume to it. There are a few things I still have left to work on and two months should be plenty of time to do it.

Unfinished items
High Priority
These are things I really want done before I wear this costume again.

  • Sheath – I have a plastic black sheath that came with my crappy sword. I’m going to create a fabric covering for it to make it better match the costume.
  • Shield – it broke on Halloween. I’ll be fixing it with my new drill today or tomorrow 😀
  • Wig – I have a second wig with some hair that I’m going to cut off and stitch to pieces of fabric, then sew it onto my Link wig to create the long parts that come down in front of the ears.
  • Boots – described in more detail below.
  • Tunic inside seams – I never ‘finished’ the edges on the inside of the tunic and its already starting to run. I should take care of this before I wear it again or the thing might fall apart.

Medium Priority

  • Shield Harness – A friend mentioned he had seen cosplayers use those zippy ties to tie props to their back. I bought some extra large heavy duty ones. I’ll give those a try and see if they work so that I can attach my shield to my back instead of carrying it on my arm all day.
  • Chain-mail – Its such a small detail but I think it adds another level of authenticity to the costume. I can live without it but why not give it a try.
  • Gauntlet – TP Link has a leather gauntlet on the arm that holds his sword (left hand in Cube version, right hand in Wii version). It’s another one of those things that people wont notice if its missing, but its nice to have.

Low Priority

I probably wont even get to these items before Fanime and that is totally fine with me. I’ll just take care of these before Halloween ’08.

  • Pant hem and tie string – They haven’t been hemmed. But no one’s going to see because it will be covered by the boots. I’m using a temporary strip of rope to tie the pants.
  • Hat detail – There’s this little seam near the tip of Link’s hat that I never got around to adding. I bet no one will notice its missing.
  • Tunic neck trim – Sometime I’d like to redo the neck trim. It didn’t come out perfect. This is the lowest thing on my priority list.

Getting Started

The biggest projects are the chain-mail and the boots.

I already have a nice pair of brown boots, but I plan to sew a new pair of "sleeves" for them. Not sure how else to describe it, but the material is kind of a shiny leather and I’d like it to match the other soft brown segments of my costume. I’m going to first make the pieces in muslin and use them as pattern pieces for cutting the final material. I’ll also need to figure out how I’m going to do the little bit of detail on the sides of his boots. Embroydery would be cool but I don’t have a machine for doing it and don’t know how to do it. I’m thinking I’ll just use the sewing machine to stitch the outline of his pattern, maybe put some interfacing in place to keep it from weakening the material. There are also some other details like the cuffs at the top of the boot that I’ll be adding.

The chain-mail is going to be a bit of a challenge. I found some great resources online on how to do it. My biggest challenge so far with it has been finding the correct wire. In Kurnous34’s chain-mail tutorial, he recommends ungalvanized stainless steel 14 gauge electric fence wire but unfortunately, I cannot find ungalvanized anywhere. All I’ve been able to find is galvanized steel. And even that is hard to find in the hardware stores. I did find it in Lowes and Home Depot, but they only came in lengths of 100 feet for like $6 which is a rip off. So I went online and found 1/4 mile for around $25 + shipping. I have purchased the rest of my supplies from Orchard Supply Hardware:

  • variable speed drill
  • wire cutters
  • gloves
  • safety glasses
  • 1/4 inch diameter, 1foot long metal rod (this was hard to find in the store but I did get it at OSH)
  • 2 clamps
  • 2 pair pliers (had these already so didn’t need to buy them)

Kurnous34 says you shouldn’t get galvanized wire because it contains chemicals that can rub off onto your clothing and stink. But Patrick Innes makes chainmail from galvanized metal without problems. I also read the comments on Kurnous34’s video and some said they used galvanized without problems. I plan to hold a rag in my hand while I’m feeding the wire around the rod and whipe the chemicals as I’m doing it. Maybe I can hose some of the chemicals off too. Anyway, all the chemical is is Zinc to keep it from rusting.

I’m only just getting started. I’ll post details of the progress of the boots and chainmail when I have them.


Gloves, Wig, Boots

A lot has happened since my last blog post. I should learn to blog more often and in smaller chunks!

The gloves are done!
I’ve finished the gloves. The brown leather part were actually from my old Ocarina of Time costume. I just cut them at the wrist area and the new teal part covers the edge. The brown part is real suede. I purchased a used leather jacket from Good Will and cut it up to make the gloves and it worked out well. I stitched it by hand purposefully making the stitches black and obvious. I think it gives it a cool look.

The teal colored part is made from faux suede material purchased from my local Jo-Ann fabrics store. It’s expensive but it feels real nice and drapes well. And I got it on sale so its ok. I included elastic in the larger end to keep it on my arm. It’s also stuffed with a couple layers of some stuff you can get at your fabric store. I can’t remember what its called. But it’s like some fluffy stuff you can purchase just like fabric and have it cut for you. I may adjust these pieces more after Halloween to make them more form fitting.

Tunic status
The tunic still seems to be the most time consuming portion of this costume. I still have a lot left to do on it. I started doing the trim on it. I had a hard time finding an olive colored shiny trim for it. I finally found one but I’m still not quite happy with it. But I had to start it if I wanted to have it done in time. I may rip it out later and redo it later with another trim if I find one after Halloween. The trim on the neck opening didn’t come out as well as I would have liked. I didn’t stitch it strait. It’s kind of crooked and a little wrinkled. But, maybe no one will notice?

The trim for the sleeves was done by first doing a strait stitch on the right side then stitched again with a zig zag stitch on the edge of the trim material to keep it from fraying. Then this material is folded into the sleeve and then hand stitched to the inside of the sleeve making sure not to poke all the way through but instead only through the base color material and not to the trim on the right side. The finished product ends up not having any visible seems which looks pretty good.

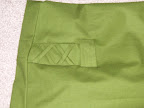
I’ve started some of the detail laces on the shoulders. I think it looks fantastic! I’ve included a photo that shows basically how I did it. First the trim has to be done on the sleeve with the two ends of the trim fabric meeting at the top of the sleeve, not the bottom. The reason for this is because this piece of fabric will be pinched similarly to what I did for the sides of the hat with parts of the fake stitches being caught inside the pinch. I made the fake stitch/lace thingies the same exact way I did for the hat. I made a long tube and then cut it into pieces. I didn’t stitch the pieces closed. Then I pinned them where I wanted them on the sleeve. Then I hand stitched the parts near that white line you see there which indicates where the pinch will be. Then I used the sewing machine to sew the pinch. After that I sewed the other end of the fake stitch/laces turning under the end piece so it wouldn’t be visible. This also causes the fake laces to lift off of the fabric a little too.

Boots
I was stressing over the boots. I was really worried because I wanted to make the boots myself but I needed a good sole for a base. I knew it would take a long time and that’s what I’m running out of! So I went to Good Will to find a cheap pair of shoes that I could rip apart and just use the base for. But the thing that puzzled me is that I didn’t know how I was going to attach the fabric to the sole. It would be difficult to sew into a sole. And gluing is messy and usually not strong enough. So I was hoping to find a pair of shoes with a real soft sole I could hopefully sew into.

While I was in there I wasn’t finding anything I thought would work that actually fit me (I have big feet, I’m a size 11 womens in US size O.O). I saw about 4 pair of boots but they were all womens boots with a large heal on them so those certainly wouldn’t work. Then while I was looking a girl and her dad were looking at a couple pair of boots. One black and one brown. The brown ones looked like they’d be PERFECT and I wouldn’t even have to completely restructure the shoes. Just put a nice covering on them or modify them a bit. So she couldn’t decide which one she wanted. I hung around waiting for my chance to swoop in should she leave the correct pair behind. Finally she walked away…. with the black pair in her hand! So I went and tried on the brown ones. They were a little big but I could always stuff them with something to make them fit better. So I walked away with an awesome pair of boots for only $7!

I swear, Good Will is one of those stores you would die if your friends ever saw you in. But sometimes its a treasure trove of goodies for costuming. And sometimes you don’t find a damn thing in there. The trick is to go early before the otherHalloweeners go and get all the good stuff. And there’s also a tone of luck involved.

Below is a photo of me posing in my boots. As you can see they are an awesome grab. I’m not even going to modify them before Halloween. Afterwards when I have more time I will work on building a new skin to go on top of these. I will probably sew them strait into the material already there.

Wig
I was walking through the mall with my Mom doing some shopping for stuff for my new place and happened to come across a kiosk selling wigs. I saw one that I thought would be really good for my costume. It was only $20 so I bought it. I don’t want to post photos of it yet but I will later. I don’t want to spoil anything! It will require minimal styling. Originally I was going to use an old long wig I bought for a Cloud costume (that I never made) but it wasn’t working well. The hair line at the top of the head looks awful and I couldn’t move hair from one side to the other side (as in I couldn’t move the part to try and make it look more natural). But my new wig has a much more natural looking hair line and the hair falls really well. All I need to do is add some extensions on the sides to make those long locks of hair Link has in front of his ears and maybe do a little trimming in the back of the wig.

New model
A co-worker who works in my company’s Japan office sent me this awesome set of Zelda action figures that you piece together. Man why does Japan get all the cool stuff! The Link one actually provides a decent reference for the costume.

green, Green, GREEN
So I’ve been on this weird green kick lately. I have no idea where its coming from! lol. For my new apartment I bought green, off white, and red towels. My new sewing box is green. And my new comforter set is green. I’m becoming obsessed. In a few years I’m gonna be sick of this color.


Starting the Tunic and Hat

This is my second journal entry about my endeavor to create a Legend of Zelda: Twilight Princess Link costume. In this one I’ll be talking about some details of the tunic and hat and show some photos of some parts that have been finished.

First let me apologize for the poor quality of my photographs. I am not a very good photographer! I hope to include much more detailed photos at a later time with detailed specs of what I did. Right now I’m keeping things a little bit general. I may make a more official tutorial at a later time.

You can find all of the photos for the making of my Link costume at my Picasa Web album:
http://picasaweb.google.com/bogusred/LinkCostumeTheMakingOf

Reference
During the course of making this costume I referenced the official artwork of Link from Twilight Princess as well as looking at what otherCosplayers did for making this same costume. I mostly referenced Pikmin Link because she is the best of the best. I think she made a lot of smart decisions. At the same time, I tried not to make mine exactly like hers but I did borrow a few of her ideas. I encourage you to check outcosplayers.com and do a search for the character you are trying to cosplay to see how others solve the same problems that you are facing. You’ll learn from what others both what does and does not work just by seeing their photos.

Do not become a Slave to your reference!

Sometimes as an artist I have had the horrible experience of becoming a slave to my reference. I see that my reference material looks awesome and try my hardest to mimic exactly what I see which usually ends up being a bad thing in the drawing world. When working from photographic reference and translating to art you don’t want to do that because you end up not doing any creative expression of what you are seeing. Also you end up becoming paralyzed by the shear amount of information before you. Instead we should try to improve what we see, not mimic it. It is something that I experienced when I first started studying figure drawing.

I experienced the same problem when I started this costume. I started to become so obsessed with Pikmin Link’s creation that I became disheartened. I was frustrated because I couldn’t find the right fabric that was exactly the same as hers. I was frustrated that I knew I wouldn’t be able to create something as great as her costume. But I finally realized that I shouldn’t try and recreate hers. But instead try to create my own interpretation of Link. Not try and duplicate what someone else did because there’s no creativity in that. I hope you don’t find yourself in that same situation. Come up with your own creative ways to make cosplay, but at the same time, learn from the trial and error of others.

Time constraint, no shortcuts
I also became frustrated by the amount of items needed for this costume. Not only the tunic and hat but pants, an under shirt, gloves, boots, chain mail, the list goes on. How the heck am I going to get it all done in two months intime for Halloween? But I decided I was just going to take it one item at a time. Otherwise I end up becoming overwhelmed by the sheer amount of work before me and never get anything done (which did happen to me a few times in the past couple weeks). I’m just going to get as much done as possible before halloween. But without rushing the creation of items. I’m not going to do a rush shitty job on a piece just because I want it in time for halloween. rather, i want to get done what I can now and then continue to work on it afterward to have it ready to wear at an anime convention. And I’m going to do things right. Not take shortcuts!

Anyway, on to the details…

Muslin prototype
I learned this technique of doing Muslin prototypes from a couple of professional costume makers called The Stitchin’ Babes. Back in 2001 they did a couple of workshops at Fanime explaining their techniques for how they make costumes and one of the things they do is when they don’t have a pattern for a particular piece of clothing for the costume, they mock it up in Muslin, try it on their manikin, and then make adjustments until it fits right. Then when the prototype is fitting and working, they tear apart the muslin prototype and use those pieces as pattern pieces. For those that don’t know, Muslin is a cheap white woven cotton fabric you can get from any fabric store for something like $1 a yard. It doesn’t stretch a whole lot so if you can fit into your muslin prototype, you should be able to fit into your finished one just fine.

A few years ago I had made a Red Link costume from The Legend of Zelda: Ocarina of Time. When I made that costume I made a Muslin template for the tunic and hat. I used these templates as a starting point for my new tunic. I didn’t want to make it exactly the same as the OoT tunic because I don’t think that one fit too well. I had made it loose in order to make it drape but it ended up making me look fat because it was too loose 🙁 So what I did was made a new prototype tunic out of Muslin for the new costume attempting to make it more form fitted on the upper part and then drape a little bit more on the waist. Also the skirt area had to be different because theTP Link has a slit in it so I would need to make adjustments to accommodate that change.

I have to tell you that I probably spent about 2 weeks developing this prototype. This means 2 weeks of not even touching my final fabric. Making a Muslin Prototype is an essential step if you want to make sure your costume fits right and you want to experiment. Because the fabric is so cheap you can buy a lot of it. If something doesn’t work out, just rip the seams out and cut a new piece or sew it in a different place. This way you don’t end up waisting or messing up your final fabric.

In my OoT tunic, the sleeves were part of the main torso piece of the fabric. I did not cut the sleeves out separately. In this new tunic, I changed that because by having the sleeves as separate pieces I could make it look more like the actualTP Link (which has a seem at the join of the sleeves and main torso of the tunic) and also make the sleeves fit and drape more correctly. The top part of the tunic has also been adjusted to conform to my body’s shape more.

When you make your prototype you can start by just pinning the fabric together and then putting it on to see if it fits. However, I’m a horribleclutz and would not attempt to wear anything with pins in it so I just sewed it together and tried it on. You can save time by using pins at first to hold the fabric together. Perhaps you will have better luck than melol. Then you can sew it when you are more committed to your seam line.

Finished Tunic prototype
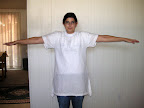
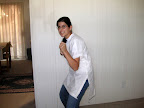
Below are some pictures of my near-final Tunic prototype. I did not include any of the detailed pieces in my prototype such as the reinforcement pieces. I figured those are things I don’t really need to include in this. I have cut my final fabric for it and pinned it together but I have not yet started sewing the tunic. After I cut the material I realized I forgot to take into consideration the shape of the back piece of the neck hole area. I will probably make some cuts on my muslin prototype and whatever I’m happy with I will replicate on my final fabric.
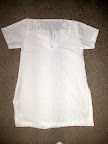
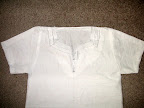
For the front of the neck hole, you’ll see two different sets of lines and fabrics in my prototype. This is because the first whole I cut I discovered was too big. When I wore the prototype the part at the bottom was at the nipple line which I felt was too low. So I cut a smaller piece of muslin and just sewed that into the inside of the prototype. So the inner line is what I’m going with. Also there is no seam allowance on the neck hole. I will not be folding in the material and sewing an edge. Instead, I will sew on a trim with a different fabric similar to the wayPikmin Link has for her tunic. I thought that was a nice touch so I’m going to try and include that in mine.

Also, this tunic is a little short. I made the mistake of buying muslin that isn’t very wide and it wasn’t wide enough to accommodate the length of the skirt. So the final has an additional 3 inches length to it with the split in the skirt 3 inches down from where it’s shown here. I may upload detailed pattern pieces at a later time.

The Hat
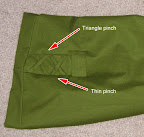
I also prototyped the hat. The old one I had made was ok but didn’t really flow well. I can’t really explain it. But it didn’t sit on my head nicely. It also had other problems with the seem so I wanted to make a lot of revisions to this pattern. Since Link’s hat inTP is a little more detailed and had a seam in it, I thought I’d use this seam to pinch out some of the fabric to make the hat fit more nicely around my head. Notice that this is one piece with one seem. You fold this piece in half and then sew along the edge making the seem at the bottom of the hat unnoticed. There’s also an additional pinch line that I’ve photoshoped into this pattern. The triangles are sections of material that are pinched together to take out material from the bottom portion of the hat to make the hat fit and drape better. The slashes are just thin pinch lines created solely for the purpose of holding the reinforcement details. You will see this in a photo of the final hat below.
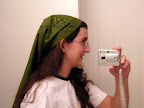
Muslin Prototype:

I made mine different from the official artwork. The official art shows only one short seam on each side of the hat. Instead I have two which is similar toPikmin Link’s design. I did this for two reasons. One I think the design just looks better, and two, by having that upper pinch it makes the shape of the hat a little more square at the top to make it fit and drape better as mentioned earlier.

This hat is pretty much done. There are only a couple things left to do. One is add the trim fabric on the rim of the hat. This will hide the ugly seems and make the hat look a little nicer. I also have not yet included the detail of the seam near the tip of the hat. I have not yet decided whether to include that or not. but its not important to me at this time. I may also make some adjustments to the fitting of it a little later.

Tunic and Hat Details
Throughout Link’s tunic and hat there are criss-cross laces or fabric to form X’s. I looked at these and wasn’t sure what they were. At first I thought they were just for pretty detail but then I started to think what their function actually was. There must be some functional reason why the artists put them there. I then thought that the ones along the side of his tunic were meant to have holes with lace going through them like the way shoes lace up to tighten the fabric. If that were the case, I would need to buy special metal pieces to hammer into the fabric to create the holes. But I didn’t see those metal rings on the illustrations. So perhaps they weren’t laces. Perhaps they are just reinforcements themselves. There is an opening of the fabric just below the armpit and I think those X’s are there to reinforce the fabric to avoid it from tearing. The opening is probably to give Link extra movement in battle. The X at the intersection of his slit also suggests that its purpose is to reinforce the fabric to keep from tearing.

I decided to take the reinforcement approach rather than the laced look, and I’m really glad I did. I saw other cosplayers on cosplayers.com take the direction of using the metal rings and lacing up the sides and it looks awful. One, it is hard to keep the fabric from bunching up in that area which makes it hard for the fabric to drape nicely. And two, the contrast in color from the metal rings and the color of the fabric makes an unnecessary distraction. I don’t want people looking at the holes. I want them looking at the overall tunic design. I noticedPikmin Link didn’t take the laced direction either (at least from what I can tell) so I wonder if perhaps she came to the same conclusion I did. Also I think doing the reinforcements is easier. I don’t want to have to deal with hammering in those metal things and worrying about what it will do to the fabric.

Of course, this doesn’t mean it isn’t possible to make the laced effect look good. I think if its done right it can look great.

Gloves, shoes, wig, etc.
I have a plan for how I will be doing the gloves which I’ll explain in a later entry. However, I’m unsure what to do about the one gauntlet strap on on the sword hand.

The shoes I’m going to do a lot of experimenting. I don’t want to do boot covers but if I run out of time I will do it as a last resort. Those things look awful. If I’m going to put THIS much detail into making my tunic and hat look good, I want everything else to be as good as possible so I’m going to attempt to make my own boots.

The wig, I’m going to experiment with as well. I purchased a long wig a while ago that I never ended up using. I will cut it and probably color it using acrylic paints. I have some fabric medium which makes the paints less glossy and softer/more flexible. Its intended for painting on fabrics but it will probably work for the wig. I’ll try it on a test piece and let you know how it goes.

For the chain mail I found an awesome video on youtube for how to make it that is low cost and fast. But this is a detail that I can afford to do without for Halloween so this is lowest on my priority list.

But for right now I’m just concentrating on getting the tunic finished. Everything else, if I don’t finish in time for Halloween I will just reuse parts from my old Link costume for Halloween and then afterwards create new, more finalized pieces and should have it done in time for Fanime.

Next
In my next entry I predict I will show how my tunic is looking and get into the gloves and pants. Stay tuned!
 

Starting new Cosplay Project

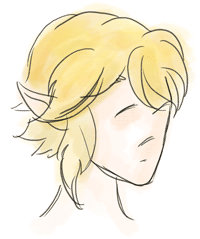
I’ve decided that this year I wanted to work on a new halloween costume. This time I’m creating a costume of Link from Twilight Princess. I intend to pay a lot more attention to detail with this costume. If all I get done before halloween is the tunic and hat, I will be happy with that. I can just use some of my parts from my old Ocarina of Time Link costume to substitute the unfinished parts. I want to take my time and get this costume right. The picture below gives you a good idea of what this character looks like. I’ll be using this as a model. I will document my process as I do it in hopes that others can benefit from my project.