Wedding – Slingshot Centerpiece

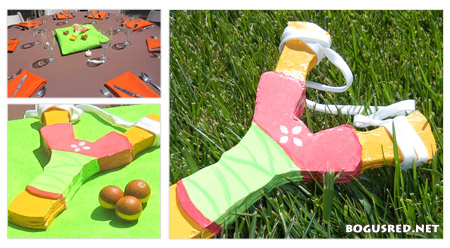
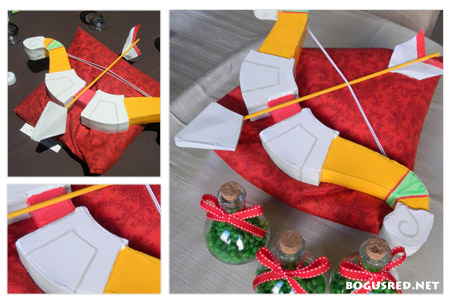
Today I have another Zelda wedding centerpiece; the slingshot. Originally I was going to base this off of the slingshot from Ocarina of Time. But when I saw the Skyward Sword slingshot design, I knew that would be a better fit. But I did at least include the deku nuts amunition from Ocarina of Time.

The artistic style and colors of Skyward Sword and Wind Waker are much brighter and more colorful. So this is why I chose for both the bow & arrow and the slingshot to be based on the Skyward Sword designs.

Made from craft foam, acrylic paint, and lanyard cord. The deku nuts are just small Styrofoam balls painted with acrylic paint.

sling shot pictures


Wedding – Boomerang Centerpiece

Another centerpiece from my Zelda themed wedding, the boomerang. A classic weapon used by Link to stun enemies and grab hard to reach items. I wish I had better quality photos of this one. I’m sure the professional photos will look much better but they wont be ready until another 8 weeks or so.

The design for this was modeled after the Wind Waker boomerang. Except I changed the center portion from gray to purple. Purple is complementary to yellow so it works well. I also added a wind swirl element to make it more interesting and wind waker-like.

Made from craft foam, modeling paste, acrylic gel, acrylic paint.

zelda boomerang centerpiece


Wedding – Wooden Signs

wedding-wooden-signs.jpg

Our venue is in a remote area of the Santa Cruz mountains down some windy roads. The venue owner suggested we make some signs to guide guests once they exit the freeway.

My Dad’s house had a wooden fence that was getting torn down last year so I asked the neighbor to save a few slats of the fence for me. The aged wood I thought would come in handy for some signage, which also reminds me a lot of Zelda.

Mike sawed the slats in half and nailed them to wooden garden stakes (~$0.60 each) that we got at the hardware store. Then I painted them with acrylic paints to say "Mike & Susie." I painted on a boomerang to be used as an arrow to indicate which way to go. The boomerang is also used in the invitation so I hoped it would be another cue to guests that it’s the right sign to follow.

The nails did not work out well. Once Mike’s Dad used the mallet to get them to stick in the ground, the signs fell off. Learning lesson, use screws and a drill instead of nails.


Wedding – Bottle Centerpieces

I came across this neat little Japanese store that was selling these awesome glass corked bottles. I thought they were an exact match to the Zelda potion bottles so I bought a few to use for centerpieces. These perhaps are not the most creative of my centerpieces, but they were very quick to make.

I created one for red potion, blue potion, green potion, and Lon Lon milk. I thought it might be too hard to prepare and transport colored liquid to the venue so I decided it might be easier if I just fill the bottles with colored stones. I saw an ad in Michael’s that glass stones were on sale for 99 cents a bag. I bought two red, two blue, and two green ($6 total for the stones) and each glass bottle was about $2. Plus $1.25 for a remnant fabric and I spent a total of about $13 for this centerpiece.

For the milk bottles, I designed a label in photoshop and printed it on some thicker paper. I attached the paper to the glass bottles using liquitex gel medium (thanks for the tip Mike Dutton!). I also bought a few small hay bales at a craft store to help complete the farm look.

red potion, blue potion, lon lon milk


Wedding – Bow and Arrow centerpiece

Another centerpiece for you, the Bow and Arrow. Central to every Zelda game, the bow and arrow is useful to Link to both attack enemies and solve dungeon puzzles. The design for this bow and arrow immitates the design from Legend of Zelda: Skyward Sword.

The bow is made from craft foam, a bit of marble paste, and a string of elastic. The arrow is made from a wooden dowel, paper, and craft foam. Both painted with liquitex acrylic paint.

Did I mention that it really shoots?

bow and arrow


Wedding – Bomb Centerpiece

Early in our planning, Mike and I came up with the idea of having each of the dining tables have a centerpiece based on one of the items in Zelda. The very first item I made was the bomb. Bombs are one of my favorite items in the game. You can use them to blow open secret passage ways and kill enemies.

One of my favorite aspects of the Legend of Zelda: The Wind Waker, was the way that the smoke animation was done for the bombs. It’s this beautiful swirly color changing cloud and I wanted to capture that in my bomb centerpiece.

A few family members might be turned off by a bomb at a wedding, but there’s no way I could leave it out. It’s such an important and iconic item in The Legend of Zelda and is perhaps my favorite centerpiece. I wish I had a plushy version of it to squeeze at night because it’s so cute!

This was made using a giant Styrofoam ball, craft foam, acrylic gel medium, marble paste, and acrylic paints.

bomb centerpiece


Wedding – First Dance

It finally happened! Mike and I were married yesterday at Hazlwood. The weather was beautiful and we were so happy to share such a wonderful day with our family and closest friends.

Mike and I have something specific we’d love to share with you first. Our first dance was a little different. I hope you enjoy our Numa Numa wedding dance.

Special thanks to our good friends Kim, Potter, Jason, Ashley, Maya, Aron for helping out!

[youtube-ExrUjggt2oM]

More Zelda Wedding related posts to come soon.


Wedding – Telescope centerpiece

The very first item you receive in The Legend of Zelda: The Wind Waker is the Telescope.

I thought it was a pretty cute item and a fairly easy one to create. First I found a sturdy roll, similar to a paper towel roll, to use as a base. I then covered it with craft foam and added more craft foam to create the edge details (yellow areas). I painted it with liquitex acrylic paints and glued on a few rhinestones. I also covered the red areas with a red glitter glue just to give it some more interest.

Originally, I made the lenses a clear plastic that you could see through. But somehow it just didn’t look right without that little bit of blue from the original artwork. So I covered the plastic with another piece of craft foam and painted it bright blue.

telescope photo montage


Wedding – Favors part 2

favors with escort card

In my last post about wedding favors, I mentioned I purchased a set of small clear bottles to use as potion bottle favors.

Like the favor, it was also tricky finding reasonably priced candy that would fit within the slim neck of the bottle. What I did find was these candies called Newblers. They are very similar in taste to Nerds and can be purchased in bulk in a variety of different colors. In order to save on cost, I only filled the bottles about 2/3 of the way, which was plenty of candy. I used about 8 lbs for every 30 bottles. It ended up costing about $1.60 per favor for the candy.

I had heard of a cute idea that you can combine your favors and your escort cards. I thought this sounded like a really nifty idea so I decided the favors would each be a different colored candy that matches the table’s napkin color. There’s also an escort card on the bottle with the guest’s name and an icon of their table’s centerpiece so they know which table is theirs.

These colored potion bottles fit right into our Legend of Zelda theme!

multicolored favors