Project Time

I recently posted an update on PD Media explaining the recent troubles with the team and status updates for the projects. The new anime spoof show is on hold. But I’m going to go ahead and start working on Surviving Together again. One trouble that I have is that I have a lot of time in the evenings but I don’t use it effectively on my projects. I end up watching a lot of tv or hanging out with my boyfriend. So I’ve devised a solution. Certain nights of the week will be designated as "project time" and I’ll work whether I want to or not. Because if I force myself, five minutes into it I’ll be engrossed in my work. It’s always been the ‘getting started’ part that keeps me from being productive.

So tonight I’m working. And I’m starting off with this blog post to get me pumped!

After I post this entry I’m going to get into working on the storyboards for Episode 1 of Surviving Together.

PaperDemon.com, geek alert
I’ve done some significant improvements on the moderator tools for PD. I took a class at work on XSLT and XML and I’m putting those skills to use in the new mod tools making things ajax powered and stuff. It’s coming along nicely. I will continue to improve the mod tools over the next couple months. XSLT is pretty sweet. I really like the idea of separating the data from the control of the layout. There’s just one thing that bugs me about XML though. Why on earth would you make the XML file decide which XSLT sheet to use? It makes no sense. I think the XSLT file should decide which XML file to use instead. The whole point is to be able to manipulate the same data in a variety of ways. But if you make the XML file declare which XSLT sheet is used, it means you have to duplicate the xml file in order to use the same data with different xslt sheets. Which defeats the whole purpose.
But I did figure out that you can use PHP and even Sarissa, an AJAX library for Javascript, to apply an XSLT file to an XML file on the fly. So that way I can keep things truly separate and flexible.

UPDATE
Turns out that applying xslt via the browser is not fully compatible with all browsers so I’ve switched to having PHP apply the xsl to xml. It’s faster this way anyway. I’m also migrating from Sarissa to jquery for AJAX interaction.

Link Costume
D-Day happened at SJSU a couple weeks ago. I don’t have too many pictures yet but when I get them I’ll post them. I finished a lot of what I needed to. Boots and wig are done. I started the gauntlet but its looking too small. May need to remake it. So all I plan to get done before Fanime is the gauntlet and the sheath covering for my sword. Chainmail is taking much longer than expected. I do have two sets that could be put along the rim of the tunic but it’s too heavy for the tunic to hold and looks stupid. I’ll either need to make a complete top half of the chainmail shirt or buy lighter rings. Anyway, I’ll save it for next Halloween.

Plans for BogusRed.net
The design is getting stale. I plan to redo the site template and put some more content on it. I’ll tap into the PD database and display my artwork from there over on BogusRed.net. I also want to integrate some feed content. Particularly my shared content from Google Reader.


Preparing for Fanime, revisiting TP Link costume

Fanime is only a couple months away and I plan to wear my TP Link costume to it. There are a few things I still have left to work on and two months should be plenty of time to do it.

Unfinished items
High Priority
These are things I really want done before I wear this costume again.

  • Sheath – I have a plastic black sheath that came with my crappy sword. I’m going to create a fabric covering for it to make it better match the costume.
  • Shield – it broke on Halloween. I’ll be fixing it with my new drill today or tomorrow 😀
  • Wig – I have a second wig with some hair that I’m going to cut off and stitch to pieces of fabric, then sew it onto my Link wig to create the long parts that come down in front of the ears.
  • Boots – described in more detail below.
  • Tunic inside seams – I never ‘finished’ the edges on the inside of the tunic and its already starting to run. I should take care of this before I wear it again or the thing might fall apart.

Medium Priority

  • Shield Harness – A friend mentioned he had seen cosplayers use those zippy ties to tie props to their back. I bought some extra large heavy duty ones. I’ll give those a try and see if they work so that I can attach my shield to my back instead of carrying it on my arm all day.
  • Chain-mail – Its such a small detail but I think it adds another level of authenticity to the costume. I can live without it but why not give it a try.
  • Gauntlet – TP Link has a leather gauntlet on the arm that holds his sword (left hand in Cube version, right hand in Wii version). It’s another one of those things that people wont notice if its missing, but its nice to have.

Low Priority

I probably wont even get to these items before Fanime and that is totally fine with me. I’ll just take care of these before Halloween ’08.

  • Pant hem and tie string – They haven’t been hemmed. But no one’s going to see because it will be covered by the boots. I’m using a temporary strip of rope to tie the pants.
  • Hat detail – There’s this little seam near the tip of Link’s hat that I never got around to adding. I bet no one will notice its missing.
  • Tunic neck trim – Sometime I’d like to redo the neck trim. It didn’t come out perfect. This is the lowest thing on my priority list.

Getting Started

The biggest projects are the chain-mail and the boots.

I already have a nice pair of brown boots, but I plan to sew a new pair of "sleeves" for them. Not sure how else to describe it, but the material is kind of a shiny leather and I’d like it to match the other soft brown segments of my costume. I’m going to first make the pieces in muslin and use them as pattern pieces for cutting the final material. I’ll also need to figure out how I’m going to do the little bit of detail on the sides of his boots. Embroydery would be cool but I don’t have a machine for doing it and don’t know how to do it. I’m thinking I’ll just use the sewing machine to stitch the outline of his pattern, maybe put some interfacing in place to keep it from weakening the material. There are also some other details like the cuffs at the top of the boot that I’ll be adding.

The chain-mail is going to be a bit of a challenge. I found some great resources online on how to do it. My biggest challenge so far with it has been finding the correct wire. In Kurnous34’s chain-mail tutorial, he recommends ungalvanized stainless steel 14 gauge electric fence wire but unfortunately, I cannot find ungalvanized anywhere. All I’ve been able to find is galvanized steel. And even that is hard to find in the hardware stores. I did find it in Lowes and Home Depot, but they only came in lengths of 100 feet for like $6 which is a rip off. So I went online and found 1/4 mile for around $25 + shipping. I have purchased the rest of my supplies from Orchard Supply Hardware:

  • variable speed drill
  • wire cutters
  • gloves
  • safety glasses
  • 1/4 inch diameter, 1foot long metal rod (this was hard to find in the store but I did get it at OSH)
  • 2 clamps
  • 2 pair pliers (had these already so didn’t need to buy them)

Kurnous34 says you shouldn’t get galvanized wire because it contains chemicals that can rub off onto your clothing and stink. But Patrick Innes makes chainmail from galvanized metal without problems. I also read the comments on Kurnous34’s video and some said they used galvanized without problems. I plan to hold a rag in my hand while I’m feeding the wire around the rod and whipe the chemicals as I’m doing it. Maybe I can hose some of the chemicals off too. Anyway, all the chemical is is Zinc to keep it from rusting.

I’m only just getting started. I’ll post details of the progress of the boots and chainmail when I have them.


2007 Reflections, 2008 Goals

I figure my first blog entry of the new year should be about reflecting back on the good times in 2007. Overall, I feel this was a pretty satisfying year. Particularly the second half of the year.

In the first half of the year I was going to school and interning at my company full time at the same time. Whenever I wasn’t at work I was working on an independent project for my senior class, the club website forShrunkenHeadMan. I completed almost everything that I set out to complete with that site. Then finished up a few more things in the summer.

In June 2007 I graduated from San Jose State University after 6 strait years of school there with a Bachelor of Fine Arts degree in Illustration/Animation. Then, I transitioned from an intern to a permanent employee at my company and its a great company too.

I took two weeks off to celebrate my graduation and spent a few days at Disneyland. [user284] and I met up in person for the first time at the Magic Kingdom. Mike, EvilbunnySlippers, and I had a blast there. It was cool to meet a good friend that I had known for so long through the internet in person for the first time. Mike and I intend to go every summer now. I hadn’t been there since I was like 10 years old and at that time I was too chicken to go on any of the roller coasters. Going as an adult the rides weren’t scary like the ones I’m used to now but they were some how more fun. I think its because of the themed aspect. Space Mountain was my favorite. I didn’t know much about it and was blown away by it. I had never been on anything like it before.

Cosplay

All of my free time from September and October I sacrificed to working on my Twilight Princess Link costume. I said that I was going to go back to it and make the chain-mail, boots, possibly another sword and other improvements. I haven’t worked on it since October but I’m thinking I might start working on it in February. My costume came out fantastic though I am not yet satisfied with the photos I have of it. Once my costume is completed I might hire a professional photographer to do some nice shots. I’d like to have the costume completed by Fanime but I’m not sure if that will happen. Depends on a lot of factors. Even though it’s incomplete, it doesn’t look incomplete. It’s at a stage where its good enough to wear to Halloween and Fanime and it is still my greatest cosplay achievement to date.

PaperDemonMedia

 This hasn’t been such a great year for the PaperDemonMedia’s website, but it has been a good past couple months for the PDM staff. In about November we started to commit to working on our new Anime Spoof show. We’ve been meeting at least once a week to brainstorm ideas, work out scripts, character designs, storyboards, and voicing. No one on the team cares too much about recording the final episode for ZMT so I’m afraid that it might never get done. But we are making a lot of progress on the new show. The first episode is 95% finished with voicing and storyboards. I’m about 90% done with theanimatic which I’ll have completed by the end of tonight. Tomorrow I will start working on backgrounds and animation. I’m not quite sure about the sprites for the main characters. I want to make some more changes because they aren’t perfect yet but part of me thinks I should just move forward. I am going to make lots of these throughout the course of the season and I don’t have to commit to the same sprites the whole show. So I think I’ll just go with it. It’s not likeZMT where each character only has one body and 3 or 4 mouths. This show each character will have different symbols for different angles. I only have two characters drawn out so far in illustrator.

It’s kind of funny. It used to be that I couldn’t draw in Illustrator for crap and I used Flash for all of my vector drawings. But now that I’ve been using Illustrator so much at work I can’t even do any vectors in Flash and I much rather prefer Illustrator. So for all of the drawings in the new show they will be done in Illustrator and imported into Flash.

The PDM team decided that we were going to release our episodes for the new show in video format rather than flash format. I’ve been concerned that the Flash animation would get off sync with the sound. We had that problem withZMT at about the 5-7 minute mark and ZMT had the most basic of animation. Since this show is much more complex, I figured that I’d do each scene of an episode in a separate Flash movie. Then export it without the sound. Then bring together the voicing, music, and movie files into Adobe Premiere and use Premiere for all of the editing, transition effects, credits, etc. Doing these movies in video format will allow us to showcase the episodes onYoutube where we think we’ll probably have greater success than we did at Newgrounds. We may still post short clips at Newgrounds to include that audience but our focus will be Youtube.

Also its important to note that we decided that we are not going to start releasing the episodes until the first season is completed. As we are working on episodes for season two we will release episodes from season one. I predict that we will get around 6 episodes done per year. I could be wrong on that. It’s too early to tell at this point. The first episode obviously takes the longest to make because all the characters have to be drawn out and designed and sprited. We have not yet decided on a name for the show yet. As soon as we do a new section will be created on the PDM site for it. We’ll also have some finished footage by then and should be able to put together a nice trailer for it. Something far more fulfilling than the teaser for Surviving Together I’m sure.

Speaking of Surviving Together, I intend to return to that this year. The progress I’m making on the Anime Spoof show is great motivation to work on Surviving Together project. Since PDM staff are having regular meetings every week it will be easier for me to show them story boards and bounce around ideas for that project in between working on episodes for the Anime spoof show, though they are far more excited about the spoof show than Surviving Together. They are more into comedy, not romance.

PaperDemon.com

This has also been a great year for PaperDemon.com. In the summer we saw a lot of popular artists who were fed up with DeviantArt join PD and bring along all of their friends. Ever since then our site has been very active. Our traffic has been up to around 30,000 unique hits per month. We also upgraded to a better server because of memory issues and other problems possibly related to the traffic flow. I was very excited to see that we were finally starting to get back the kind of traffic that we had in early 2006. Some how once I started my job in summer 2006PD’s traffic went down the drain, perhaps because I wasn’t there as often to keep it going? I actually don’t know what happened.

But anyway, we got that nice boost in traffic. We had to recruit several more moderators to keep up with the pace. In November the moderators and I started to seriously fall behind in reviewing the artwork. Our "queue" was often above 100 entries. By mid December it reached over 300 artwork entries and we had to lower the submission limit from 15 per day to 8 per day. I didn’t really want to do it but I felt it was necessary because of how behind we were. Then within the past two weeks two new Junior Mods, [user52] and [user2462] started and helped the other moderators pound through the queue. At the time of the writing of this blog post, the queue forunreviewed artwork is at ZERO. Of course, now the Senior Mod queue is as high as its ever been with 148 entries. I’m going to give the Senior mods and I a chance to catch up before increasing the daily submission limit back to 15.

This hasn’t been a very big year for PD as far as site improvements and feature additions as compared to years past. Mostly because I’ve been very busy with work and now the new show. Also throughout September and October I was busy with my costume and didn’t work on PD much then. But we did do a few major improvements. One, we released the blog feature in time for Christmas, introduced a new menu system for browsing galleries in Art and Writing, created a new interface for selecting galleries in the members area, and the Comics section launched. We also changed the site design in April to a theme inspired by The Legend of Zelda Twilight Princess. The design is my favorite design we’ve had so far and I have no intentions of changing it in 2008. Though I may feel different by the time April rolls around. Usually I try and update the design template at thebeginning of each year to keep things fresh looking. But I think I’d rather make changes to other parts of the site to make it fit better with the current design. There are still some areas that have things based on the design template from 2006 that need to be updated.

Which leads me to my focus for 2008. This year I would like to spend time refining the site, fixing the little things here and there that don’t match and are legacy code from back in the day. There are a lot of things that could use improvement. There are also things that were started and never completed, such as the Groups section. I’d like to finish up the feature and make it open so that anyone can create a group and create galleries for it. But in its current state its so incomplete that its virtually impossible for anyone to really run a group unless its me because it involves a lot of manual data entry in the database. The little bars that appear aboveevery one’s profile I think will probably end up being revamped (you know those things that show your avatar, username , and links to your art, writing, etc). I also want to make profile skins reflected across more areas of a user’s content. Like when you are viewing their gallery and writing submissions. But it means it will end up being more work to create new skins. Oh well I’ll figure something out. There are things in the members area that could be more user friendly as well that I intend to fix. In addition to that I want to improve the exportability of my code so that it can more easily be used for other projects. Page loading time is also of concern as it seems many of the pages are taking longer than they should to load, so benchmarking and improving speed are goals for me in 2008.

Drawing life

[thumb16902] [thumb16568] [thumb16605]
I have done a few drawings lately. I find that pencil and paper still gives me the best line art for most of my personal art. I have a few entries that I still need to finish up and color. I’m glad to be back and drawing again.

Personal Life

So in my personal life, back in September I moved out of my Mom’s house and into an apartment with my boyfriend Mike. Things have been going pretty well. I’m learning to cook. Last night I made roast chicken for the first time, all by myself! And underneath the rack with the chicken was potatoes, carrots, and onions getting flavor from the chicken drippings. Oh my, it was delish! I wish I had taken pictures. Mike likes that I’m taking on some of the domestic duties. His mom is also a lot of help. She’s Italian and often gives me recipes and advice. Which works for me because Italian is my favorite type of food. I hate cleaning though so I let Mike handle a lot of those duties. If I cook, he has to do the dishes afterward. I think that’s pretty fair. I also handle all of the grocery shopping. We’re working it out.

Music

My music stinks right now. I haven’t been playing piano lately and I’m starting to forget some of the songs I used to play all the time. It’s been like this for over a year now. I just sort of lost interest. I think its because I haven’t been trying to learn new music. I also wasn’t listening to new music.

So now I’m buying more music. I’m getting really into Kelly Sweet. My favorite song of hers is Giorno Dopo Giorno. I think I’ve listened to it like 10 times today. I can’t get it out of my head. I also recently got Sasha Lazard’s Myth of Red and I’m enjoying that quite a bit. I hope to record some new tunes by the end of this month. I’ll certainly be needing music for the new show and I’ve alsocommitted to working on an OCR project. So hopefully I’ll have some new music up on BogusRed.net by March.


Blam!

Wow I haven’t posted a blog entry in a while. Damnit! Things have been crazy busy.

Work is great. I’m perkier than usual. I’m enjoying making some of the tools at work. Things are going pretty well there.

And lately when I’m not working at my job, I’m working on our new PaperDemonMedia show. We’ve got the script for the first episode done and have started character designs as well as some voicing. I’m not sure yet whether I should share the designs. I will discuss with the other PDM staff members and if they say its cool I’ll post some of my work.

We’ve got a good flow going right now. We are meeting every week to brainstorm and work on the show. I’m happy to see so much collaberation. However, I still feel that a lot of the burden of work is resting on my shoulders. I’m doing all of the art and animation as well as organizing things. It’s a lot of work but I enjoy being in charge I guess. Though its tough when we get together and then get off topic and waste time. But we are having a lot of fun working on the show.

I have yet to blog about how my Halloween costume came out… So it came out pretty well as you can see from my photos in my Link Photo album. I enjoyed walking around that day and having people recognize who I was. I was in the grocery store and a few people said "Woah, it’s Link!" and I was holding in my excitement. Everyone at work was blown away by my costume as well. I’m not satisfied by my photos though. I don’t have any that really look that good other than the glamore shot but that doesn’t show all the cool detail I put into the costume. The angles are either boring, unflatering to my figure, or don’t show the cool features of the costume. Damnit. I will need to do more photos when I get the costume closer to completion.

The costume still has a ways to go. The ears were missing because I didn’t have any liquid latex that was usable to use to attach the ears. I forgot to buy a new bottle. Silly me. Also the shield broke during the day. Someone helped me fix it though with telephone wire haha. It’s just a temporary fix though. I still need to start the chain mail. I also need a better sword. I also want to do a significant amount of work on the boots. The wig needs work as well. Hopefully I’ll have it all done in time for Fanime. I’m taking a break from it all right now but I’ll get back into it in a couple months or so.

 Anyway, that is my update for now. I’m going to be taking a rather long holiday break. Something like 2 and a half weeks long to work on my art, PD, and the new PDM show. I’m looking forward to it!


Costume status, Belts and Pants

Halloween is just a little over a week away but I’m feeling very confident that my costume will be ready in time. Here’s the status of all the components. I set more realistic goals for having this done for Halloween. But after Halloween is over I intend to work on the costume more to add additional details and modifications.

Goals Percent completed for Halloween as of Oct 22
Tunic – 83%

I still have to finish the trim, add the laces on the sides, and add the laces on the front chest near the neck opening.

Hat – 100%
Undershirt – 100%
Pants – 100%
Waist Belt – 99%

Just need to cut a hole for the buckle to go through.

Chest Belt – 90%

Need to create the shoulder pad, add the button, and cut a hole for the buckle to go through.

Wig – 0?

i haven’t yet modified it. in its current state it is ok to wear for halloween but I’d like to style it if i have time

Shield – 0%

I got a shield for my birthday. I need to just make a new strap for it because the one it comes with is crap. This will only take me a couple hours to make. I was hoping to be able to attach it to my back as Link does when he doesn’t have his weapons out. But its too heavy and I’d have no way to securely support it.

Sword – 0%?

I haven’t given the sword much thought. I’m probably not even going to touch it. I modified a plastic sword a few years back to look like the Master Sword but it doesn’t look too much like it. I’ll probably need to make some little strips of fabric to hold thescabbard to the chest belt.

Gloves – 100%
Boots – 100%

I’m using the boots in their original form without modifying them.

Goals Percent complete of what I ultimately want
Tunic – 73%

I’d like to redo the trim on the front of the tunic if possible. But it may not happen. This was the toughest part of the tunic to do.

Hat – 95%

There’s a detail near the tip of the hat of a seam. I decided it was a detail I could live without for now and will add later. Also there’s a seem from the trim showing at the bottom of the hat. no one will see it so its low priority.

Undershirt – 100%
Pants – 90%

Still need to hem the pants and get/make a better draw string. these are things that will be covered up by the tunic and boots so its low priority.

Waist Belt – 95%
Chest Belt – 90%
Wig – 0%

I have the wig but have not yet styled it. i’d like to add extensions on the sides and do some trimming and styling.

Shield and Sword

The Shield I have is decent but the paint job isn’t too great. I’d actually eventually like to make my own shield and sword but I don’t have the tools nor the knowledge to make them so I’m not sure what to do.

Chainmail – 0%

This is the biggest thing I have left to work on after Halloween. I didn’t even bother to attempt to have it done for Halloween and I’m glad I didn’t because everything else is taking up all of my time. There’s no way I could have fit in working on chainmail.

Gloves – 60%?

I may want to redo the gloves completely but I’m not sure yet.

Misc
I need to buy some blue hoop earings. I’d also like to get some better latex elf ears.
Boots – 0%

I want to make major modifications to the boots. I basically want to build a new casing to go ontop of the existing boot material.

Belts
I’ve posted a lot of photos that show how I made the belts. They have short descriptions already. I will probably create more detailed instructions at a later time.


Undershirt
The undershirt I did not create from scratch. Instead I went online to try and find a shirt similar to what I needed and then modify it. I found a great shirt at Target.com. It’s Mossimo Supply Co.’s Junior Long Sleeve Turtle Neck shirt. I bought a size Large but I wish I had went up another size because the sleeves are a tad too tight. But it still fits. Anyway, I added interfacing to the neck and chest, cut a slit, trimmed a couple inches off of the turtle neck, sewed the edges, and then just added eyelets/gromits. I did all of it in an afternoon.


Pants
For the pants, I purchased a pattern from the fabric store. The pattern is Simplicity 7092. I created Pattern A without the pockets. The fabric I used is "Aged Muslin."

It claims that its a 1 Hour pattern but it took me much longer than an hour to make. It takes an hour just to lay out the fabric, cut the pattern pieces, and cut the fabric. But it still goes pretty quick compared to some of the other stuff needed for this costume. To give you an idea, it took me two evenings to make it. Also, the pattern as is will result in very baggy pants. I brought the seams in a lot to make them look more fitted as Link’s pants are. Just follow the directions and then try the pants on. if they’re too baggy you can bring them in. Be sure to pin where you want the new seam to be and try it on before sewing. Make sure you have enough room to bend your knees and sit down and move around before you sew the final stitch.

More to come! It’s possible I may not post another blog until after Halloween because I’m going to be spending every spare moment finishing up the tunic. But I’ll try my best to make another entry this coming Sunday.


Gloves, Wig, Boots

A lot has happened since my last blog post. I should learn to blog more often and in smaller chunks!

The gloves are done!
I’ve finished the gloves. The brown leather part were actually from my old Ocarina of Time costume. I just cut them at the wrist area and the new teal part covers the edge. The brown part is real suede. I purchased a used leather jacket from Good Will and cut it up to make the gloves and it worked out well. I stitched it by hand purposefully making the stitches black and obvious. I think it gives it a cool look.

The teal colored part is made from faux suede material purchased from my local Jo-Ann fabrics store. It’s expensive but it feels real nice and drapes well. And I got it on sale so its ok. I included elastic in the larger end to keep it on my arm. It’s also stuffed with a couple layers of some stuff you can get at your fabric store. I can’t remember what its called. But it’s like some fluffy stuff you can purchase just like fabric and have it cut for you. I may adjust these pieces more after Halloween to make them more form fitting.

Tunic status
The tunic still seems to be the most time consuming portion of this costume. I still have a lot left to do on it. I started doing the trim on it. I had a hard time finding an olive colored shiny trim for it. I finally found one but I’m still not quite happy with it. But I had to start it if I wanted to have it done in time. I may rip it out later and redo it later with another trim if I find one after Halloween. The trim on the neck opening didn’t come out as well as I would have liked. I didn’t stitch it strait. It’s kind of crooked and a little wrinkled. But, maybe no one will notice?

The trim for the sleeves was done by first doing a strait stitch on the right side then stitched again with a zig zag stitch on the edge of the trim material to keep it from fraying. Then this material is folded into the sleeve and then hand stitched to the inside of the sleeve making sure not to poke all the way through but instead only through the base color material and not to the trim on the right side. The finished product ends up not having any visible seems which looks pretty good.

I’ve started some of the detail laces on the shoulders. I think it looks fantastic! I’ve included a photo that shows basically how I did it. First the trim has to be done on the sleeve with the two ends of the trim fabric meeting at the top of the sleeve, not the bottom. The reason for this is because this piece of fabric will be pinched similarly to what I did for the sides of the hat with parts of the fake stitches being caught inside the pinch. I made the fake stitch/lace thingies the same exact way I did for the hat. I made a long tube and then cut it into pieces. I didn’t stitch the pieces closed. Then I pinned them where I wanted them on the sleeve. Then I hand stitched the parts near that white line you see there which indicates where the pinch will be. Then I used the sewing machine to sew the pinch. After that I sewed the other end of the fake stitch/laces turning under the end piece so it wouldn’t be visible. This also causes the fake laces to lift off of the fabric a little too.

Boots
I was stressing over the boots. I was really worried because I wanted to make the boots myself but I needed a good sole for a base. I knew it would take a long time and that’s what I’m running out of! So I went to Good Will to find a cheap pair of shoes that I could rip apart and just use the base for. But the thing that puzzled me is that I didn’t know how I was going to attach the fabric to the sole. It would be difficult to sew into a sole. And gluing is messy and usually not strong enough. So I was hoping to find a pair of shoes with a real soft sole I could hopefully sew into.

While I was in there I wasn’t finding anything I thought would work that actually fit me (I have big feet, I’m a size 11 womens in US size O.O). I saw about 4 pair of boots but they were all womens boots with a large heal on them so those certainly wouldn’t work. Then while I was looking a girl and her dad were looking at a couple pair of boots. One black and one brown. The brown ones looked like they’d be PERFECT and I wouldn’t even have to completely restructure the shoes. Just put a nice covering on them or modify them a bit. So she couldn’t decide which one she wanted. I hung around waiting for my chance to swoop in should she leave the correct pair behind. Finally she walked away…. with the black pair in her hand! So I went and tried on the brown ones. They were a little big but I could always stuff them with something to make them fit better. So I walked away with an awesome pair of boots for only $7!

I swear, Good Will is one of those stores you would die if your friends ever saw you in. But sometimes its a treasure trove of goodies for costuming. And sometimes you don’t find a damn thing in there. The trick is to go early before the otherHalloweeners go and get all the good stuff. And there’s also a tone of luck involved.

Below is a photo of me posing in my boots. As you can see they are an awesome grab. I’m not even going to modify them before Halloween. Afterwards when I have more time I will work on building a new skin to go on top of these. I will probably sew them strait into the material already there.

Wig
I was walking through the mall with my Mom doing some shopping for stuff for my new place and happened to come across a kiosk selling wigs. I saw one that I thought would be really good for my costume. It was only $20 so I bought it. I don’t want to post photos of it yet but I will later. I don’t want to spoil anything! It will require minimal styling. Originally I was going to use an old long wig I bought for a Cloud costume (that I never made) but it wasn’t working well. The hair line at the top of the head looks awful and I couldn’t move hair from one side to the other side (as in I couldn’t move the part to try and make it look more natural). But my new wig has a much more natural looking hair line and the hair falls really well. All I need to do is add some extensions on the sides to make those long locks of hair Link has in front of his ears and maybe do a little trimming in the back of the wig.

New model
A co-worker who works in my company’s Japan office sent me this awesome set of Zelda action figures that you piece together. Man why does Japan get all the cool stuff! The Link one actually provides a decent reference for the costume.

green, Green, GREEN
So I’ve been on this weird green kick lately. I have no idea where its coming from! lol. For my new apartment I bought green, off white, and red towels. My new sewing box is green. And my new comforter set is green. I’m becoming obsessed. In a few years I’m gonna be sick of this color.


Starting the Tunic and Hat

This is my second journal entry about my endeavor to create a Legend of Zelda: Twilight Princess Link costume. In this one I’ll be talking about some details of the tunic and hat and show some photos of some parts that have been finished.

First let me apologize for the poor quality of my photographs. I am not a very good photographer! I hope to include much more detailed photos at a later time with detailed specs of what I did. Right now I’m keeping things a little bit general. I may make a more official tutorial at a later time.

You can find all of the photos for the making of my Link costume at my Picasa Web album:
http://picasaweb.google.com/bogusred/LinkCostumeTheMakingOf

Reference
During the course of making this costume I referenced the official artwork of Link from Twilight Princess as well as looking at what otherCosplayers did for making this same costume. I mostly referenced Pikmin Link because she is the best of the best. I think she made a lot of smart decisions. At the same time, I tried not to make mine exactly like hers but I did borrow a few of her ideas. I encourage you to check outcosplayers.com and do a search for the character you are trying to cosplay to see how others solve the same problems that you are facing. You’ll learn from what others both what does and does not work just by seeing their photos.

Do not become a Slave to your reference!

Sometimes as an artist I have had the horrible experience of becoming a slave to my reference. I see that my reference material looks awesome and try my hardest to mimic exactly what I see which usually ends up being a bad thing in the drawing world. When working from photographic reference and translating to art you don’t want to do that because you end up not doing any creative expression of what you are seeing. Also you end up becoming paralyzed by the shear amount of information before you. Instead we should try to improve what we see, not mimic it. It is something that I experienced when I first started studying figure drawing.

I experienced the same problem when I started this costume. I started to become so obsessed with Pikmin Link’s creation that I became disheartened. I was frustrated because I couldn’t find the right fabric that was exactly the same as hers. I was frustrated that I knew I wouldn’t be able to create something as great as her costume. But I finally realized that I shouldn’t try and recreate hers. But instead try to create my own interpretation of Link. Not try and duplicate what someone else did because there’s no creativity in that. I hope you don’t find yourself in that same situation. Come up with your own creative ways to make cosplay, but at the same time, learn from the trial and error of others.

Time constraint, no shortcuts
I also became frustrated by the amount of items needed for this costume. Not only the tunic and hat but pants, an under shirt, gloves, boots, chain mail, the list goes on. How the heck am I going to get it all done in two months intime for Halloween? But I decided I was just going to take it one item at a time. Otherwise I end up becoming overwhelmed by the sheer amount of work before me and never get anything done (which did happen to me a few times in the past couple weeks). I’m just going to get as much done as possible before halloween. But without rushing the creation of items. I’m not going to do a rush shitty job on a piece just because I want it in time for halloween. rather, i want to get done what I can now and then continue to work on it afterward to have it ready to wear at an anime convention. And I’m going to do things right. Not take shortcuts!

Anyway, on to the details…

Muslin prototype
I learned this technique of doing Muslin prototypes from a couple of professional costume makers called The Stitchin’ Babes. Back in 2001 they did a couple of workshops at Fanime explaining their techniques for how they make costumes and one of the things they do is when they don’t have a pattern for a particular piece of clothing for the costume, they mock it up in Muslin, try it on their manikin, and then make adjustments until it fits right. Then when the prototype is fitting and working, they tear apart the muslin prototype and use those pieces as pattern pieces. For those that don’t know, Muslin is a cheap white woven cotton fabric you can get from any fabric store for something like $1 a yard. It doesn’t stretch a whole lot so if you can fit into your muslin prototype, you should be able to fit into your finished one just fine.

A few years ago I had made a Red Link costume from The Legend of Zelda: Ocarina of Time. When I made that costume I made a Muslin template for the tunic and hat. I used these templates as a starting point for my new tunic. I didn’t want to make it exactly the same as the OoT tunic because I don’t think that one fit too well. I had made it loose in order to make it drape but it ended up making me look fat because it was too loose 🙁 So what I did was made a new prototype tunic out of Muslin for the new costume attempting to make it more form fitted on the upper part and then drape a little bit more on the waist. Also the skirt area had to be different because theTP Link has a slit in it so I would need to make adjustments to accommodate that change.

I have to tell you that I probably spent about 2 weeks developing this prototype. This means 2 weeks of not even touching my final fabric. Making a Muslin Prototype is an essential step if you want to make sure your costume fits right and you want to experiment. Because the fabric is so cheap you can buy a lot of it. If something doesn’t work out, just rip the seams out and cut a new piece or sew it in a different place. This way you don’t end up waisting or messing up your final fabric.

In my OoT tunic, the sleeves were part of the main torso piece of the fabric. I did not cut the sleeves out separately. In this new tunic, I changed that because by having the sleeves as separate pieces I could make it look more like the actualTP Link (which has a seem at the join of the sleeves and main torso of the tunic) and also make the sleeves fit and drape more correctly. The top part of the tunic has also been adjusted to conform to my body’s shape more.

When you make your prototype you can start by just pinning the fabric together and then putting it on to see if it fits. However, I’m a horribleclutz and would not attempt to wear anything with pins in it so I just sewed it together and tried it on. You can save time by using pins at first to hold the fabric together. Perhaps you will have better luck than melol. Then you can sew it when you are more committed to your seam line.

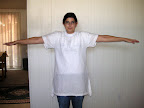
Finished Tunic prototype
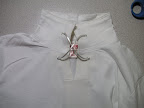
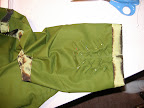
Below are some pictures of my near-final Tunic prototype. I did not include any of the detailed pieces in my prototype such as the reinforcement pieces. I figured those are things I don’t really need to include in this. I have cut my final fabric for it and pinned it together but I have not yet started sewing the tunic. After I cut the material I realized I forgot to take into consideration the shape of the back piece of the neck hole area. I will probably make some cuts on my muslin prototype and whatever I’m happy with I will replicate on my final fabric.

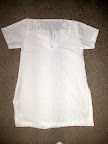
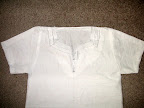
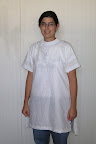
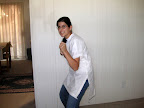
For the front of the neck hole, you’ll see two different sets of lines and fabrics in my prototype. This is because the first whole I cut I discovered was too big. When I wore the prototype the part at the bottom was at the nipple line which I felt was too low. So I cut a smaller piece of muslin and just sewed that into the inside of the prototype. So the inner line is what I’m going with. Also there is no seam allowance on the neck hole. I will not be folding in the material and sewing an edge. Instead, I will sew on a trim with a different fabric similar to the wayPikmin Link has for her tunic. I thought that was a nice touch so I’m going to try and include that in mine.

Also, this tunic is a little short. I made the mistake of buying muslin that isn’t very wide and it wasn’t wide enough to accommodate the length of the skirt. So the final has an additional 3 inches length to it with the split in the skirt 3 inches down from where it’s shown here. I may upload detailed pattern pieces at a later time.

The Hat
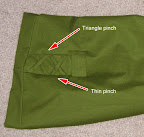
I also prototyped the hat. The old one I had made was ok but didn’t really flow well. I can’t really explain it. But it didn’t sit on my head nicely. It also had other problems with the seem so I wanted to make a lot of revisions to this pattern. Since Link’s hat inTP is a little more detailed and had a seam in it, I thought I’d use this seam to pinch out some of the fabric to make the hat fit more nicely around my head. Notice that this is one piece with one seem. You fold this piece in half and then sew along the edge making the seem at the bottom of the hat unnoticed. There’s also an additional pinch line that I’ve photoshoped into this pattern. The triangles are sections of material that are pinched together to take out material from the bottom portion of the hat to make the hat fit and drape better. The slashes are just thin pinch lines created solely for the purpose of holding the reinforcement details. You will see this in a photo of the final hat below.
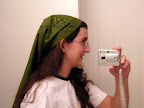
Muslin Prototype:

I made mine different from the official artwork. The official art shows only one short seam on each side of the hat. Instead I have two which is similar toPikmin Link’s design. I did this for two reasons. One I think the design just looks better, and two, by having that upper pinch it makes the shape of the hat a little more square at the top to make it fit and drape better as mentioned earlier.

This hat is pretty much done. There are only a couple things left to do. One is add the trim fabric on the rim of the hat. This will hide the ugly seems and make the hat look a little nicer. I also have not yet included the detail of the seam near the tip of the hat. I have not yet decided whether to include that or not. but its not important to me at this time. I may also make some adjustments to the fitting of it a little later.

Tunic and Hat Details
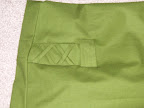
Throughout Link’s tunic and hat there are criss-cross laces or fabric to form X’s. I looked at these and wasn’t sure what they were. At first I thought they were just for pretty detail but then I started to think what their function actually was. There must be some functional reason why the artists put them there. I then thought that the ones along the side of his tunic were meant to have holes with lace going through them like the way shoes lace up to tighten the fabric. If that were the case, I would need to buy special metal pieces to hammer into the fabric to create the holes. But I didn’t see those metal rings on the illustrations. So perhaps they weren’t laces. Perhaps they are just reinforcements themselves. There is an opening of the fabric just below the armpit and I think those X’s are there to reinforce the fabric to avoid it from tearing. The opening is probably to give Link extra movement in battle. The X at the intersection of his slit also suggests that its purpose is to reinforce the fabric to keep from tearing.

I decided to take the reinforcement approach rather than the laced look, and I’m really glad I did. I saw other cosplayers on cosplayers.com take the direction of using the metal rings and lacing up the sides and it looks awful. One, it is hard to keep the fabric from bunching up in that area which makes it hard for the fabric to drape nicely. And two, the contrast in color from the metal rings and the color of the fabric makes an unnecessary distraction. I don’t want people looking at the holes. I want them looking at the overall tunic design. I noticedPikmin Link didn’t take the laced direction either (at least from what I can tell) so I wonder if perhaps she came to the same conclusion I did. Also I think doing the reinforcements is easier. I don’t want to have to deal with hammering in those metal things and worrying about what it will do to the fabric.

Of course, this doesn’t mean it isn’t possible to make the laced effect look good. I think if its done right it can look great.

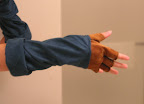
Gloves, shoes, wig, etc.
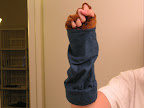
I have a plan for how I will be doing the gloves which I’ll explain in a later entry. However, I’m unsure what to do about the one gauntlet strap on on the sword hand.

The shoes I’m going to do a lot of experimenting. I don’t want to do boot covers but if I run out of time I will do it as a last resort. Those things look awful. If I’m going to put THIS much detail into making my tunic and hat look good, I want everything else to be as good as possible so I’m going to attempt to make my own boots.

The wig, I’m going to experiment with as well. I purchased a long wig a while ago that I never ended up using. I will cut it and probably color it using acrylic paints. I have some fabric medium which makes the paints less glossy and softer/more flexible. Its intended for painting on fabrics but it will probably work for the wig. I’ll try it on a test piece and let you know how it goes.

For the chain mail I found an awesome video on youtube for how to make it that is low cost and fast. But this is a detail that I can afford to do without for Halloween so this is lowest on my priority list.

But for right now I’m just concentrating on getting the tunic finished. Everything else, if I don’t finish in time for Halloween I will just reuse parts from my old Link costume for Halloween and then afterwards create new, more finalized pieces and should have it done in time for Fanime.

Next
In my next entry I predict I will show how my tunic is looking and get into the gloves and pants. Stay tuned!


Starting new Cosplay Project

I’ve decided that this year I wanted to work on a new halloween costume. This time I’m creating a costume of Link from Twilight Princess. I intend to pay a lot more attention to detail with this costume. If all I get done before halloween is the tunic and hat, I will be happy with that. I can just use some of my parts from my old Ocarina of Time Link costume to substitute the unfinished parts. I want to take my time and get this costume right. The picture below gives you a good idea of what this character looks like. I’ll be using this as a model. I will document my process as I do it in hopes that others can benefit from my project.